
I should be doing other things right now, but I really felt like making a tutorial today because… 1) I want to avoid doing those other chores, 2) some of the things I did to ‘fix’ the image were rather cool, 3) I want to have it written down somewhere so that if in the future I want to remember what I did I can refer back to this post, and 4) hopefully you will get something out of this post that will help you ‘fix’ one of your images.

I did a few things to this image to ‘fix’ it. Originally the image was a bit yellow and it was a jpg image so changing the white balance took a few tweaks. Additionally, I removed some noise, lightened my pup’s face a bit, including making her eyes seem less bloodshot, and then I removed some distracting elements from the corners.
I used Open Source Software and a few plug-ins…
 1. White Balance Using Dark Table
I used DarkTable this time (instead of UFRaw) because I wanted to see if I could fix the white balance any easier by playing with the WhiteBalance toggles (also UFRaw requires a Raw image, this was a jpg). DarkTable has a lot of the features you might find in LightRoom… I tend not to use it as much because I was trying to use software that was available to all platforms for my tutorials, DarkTable is not available for Windows.
As you can see I was able to make a bit of a change using the White Balance Toggles…


Mostly I reduced the red and increased the blue to make the white balance a bit less yellow.

But the real magic was achieved in GIMP, which is why after 8 months of using GIMP I am still an advocate.
 2. Color Curves Using GIMP

I’ve talked about Color Curves briefly here (Pat David has a great tutorial on color curves). The curves module will also allow you to play with the Red/Green/Blue Channels to adjust your image color.
I always make a copy of the layer I’m working on so that if I don’t like what I’ve done, I can go back. To do that go to Layer->Duplicate Layer. Then go to Colors->Curves, you will get this adjustment window…

Normally you would just adjust the exposure by moving the curve, but if you use the Channel: Value drop menu you can change the Red, Green, and Blue channels separately to change the color of your image…

In the Red Channel you can move the curve up to make your image more Red, or you can move your curve down to make it more Cyan. Likewise, the Green Channel allows you to adjust Green and Magenta. Whereas, the Blue Channel allows you to adjust Blue and Yellow. The cursor becomes any eyedropper so you can click on a specific area of your image and when you change the channel there will be a line indicating where that change would take place in each of the channels – it’s really helpful. I clicked on an area of my dog’s face that is white…

By pulling the red down I created more Cyan, and by pulling the blue up I created more Blue…

I just kept tweaking the two channels until I thought it looked ‘right’, which gave me this…

3. Levels Using GIMP
Next I needed to lighten up my image a bit. After making a duplicate of my Color Curves layer (Layer->Duplicate Layer), I went to Colors->Levels and pulled the white toggle to the left…

Giving me this…

which I thought was a little overexposed, so I changed the opacity to ~75%, giving me this…

4. Histogram
You may have noticed that the histogram was getting a bit beaten up with all those changes, making big changes to exposure tends to create ‘noise’ in your images. And your histogram will look like it’s been through a grater. This particular image isn’t too bad, but I think it is a good practice to try to clean up noise when you see it starting to creep in. I made a little histogram Gif of my image, watch the histogram get beat up then repaired…

5. Noise Reduction Using G’MIC Plug-In for GIMP
I really like the Noise Reduction in the G’MIC Plug-in for GIMP. Because I used 75% opacity on my levels layer, I need to make a new layer that combines the levels and curves layer… go to Layers->New from Visible. Then go to Filters->G’MIC->Repair->Iain’s Noise Reduction…

Be sure to change the Input/Output dropdown menus to Active, New Layer, and Verbose (layer name), so that you will get a new layer that tells you what was done in G’MIC.
Below you can see what values I chose by looking at that verbose layer name…

This image wasn’t too noisy, so I just put a light touch on the noise reduction, here’s a side-by-side comparison, be sure to look in the shadows for the most noticeable change…
6. Fixing A Few Areas Using GIMP
6.1 Making Bloodshot Eye Look Less Red
If you’ve ever met a Basset Hound before, you know that they have really droopy eyes. Sometimes that redness in their eyes doesn’t make for the best photograph. Plus my dog is allergic to several things in the air (trees, grasses, etc.) and on this day her eyes were a little more red than usual.
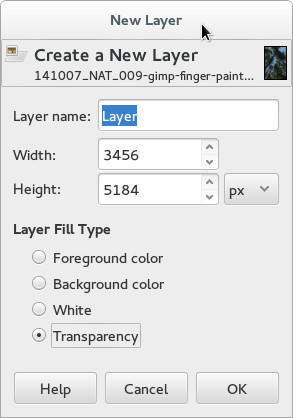
This ‘fix’ is fairly easy, the ‘hard’ part is dependent upon your ability to draw with your mouse/trackball/finger/wacom/etc. Make a new transparent layer above all the other layers, Layer->New Layer->Transparency.
Zooming way in on her eye, I used the eyedropper tool to take a sample from the color of the eye that was not red, then I used the airbrush tool and lightly painted over the eye (on the transparent layer). Then I changed the transparent layer blend mode to Hue…

6.2 Lightening Up The Face Area (removing some of the shadow)
I felt that her face was a bit too dark and hidden in shadow, so I wanted to lighten it up just a touch. I created another new transparent layer on top of all the other layers. Using the airbrush I lightly painted white over her face in the areas I wanted lightened. Then I changed the blend mode to Overlay and changed the opacity to 50%…
6.3 Lighten Right Eye
Her right eye is still really dark and I just wanted it to be a bit more visible. So once I again, I created another new transparent layer on top of all the other layers. Zoomed way in on her eye, then using the airbrush and basic white, I painted the white of her eye, and then changed the blend mode to Overlay. I left the opacity at 100%…
7. Cloning Using the Clone Tool in GIMP
For the distracting objects in the corners I used the cloning tool. I was pretty lucky that the rug is fairly easy to clone and not look obvious. 
Simply Ctrl-Click on an area that you would like to clone, then click on the area you would like to cover. It takes some finesse but it is doable.
8.Final Sharpening Using Wavelet Decompose Plug-in for GIMP
I like to sharpen up my images last. Lately I’ve been using a plug-in called Wavelet Decompose. I first mentioned it here, and have really liked the results and have kept using it.
This works best if you create a new Visible layer first, just in case you have some layers depending upon other layers. Go to Filters->Generic->Wavelet Decompose. I tend to use the default value of 5, and typically delete all but wavelet 3 & 4… then keep one or the other, sometimes I keep both depending upon the amount of detail it brings.

You will get the number of wavelet scale layers that you choose plus a residual layer…

In this particular image it is rather difficult to see much in the 1st and 2nd layers, these layers contain the smallest of details – so in another image it might contain more data. Layers 1-5 are automatically set to blend mode Grain Merge so they layer on top of one another. I delete layers 1, 2, 5, and the residual layer and then try to determine if the combo of 3&4 is too much…

I decided that there was just the right amount of sharpening with Wavelet Decompose Scale 3 only.
One Four Challenge
This image was used as the first week of the September One Four Challenge. As you can see I did a bit of fiddling to get the image to a better place, but it didn’t take very long to do. In all honesty, writing this tutorial took far longer to create than the Week 1 image.
I do hope that you learned something from this breakdown/tutorial and that you will try some or all of the techniques explained here.
Once again, the before and after (click to enlarge)…
-

- Original
-

- Week 1
Until next time…
~nic
* GIMP is Open Source software that is available for all platforms (Linux, Mac, and Windows), it is a photo editor that does many (if not all) of the things you can do in Photoshop. You can download it for free here. The GIMP online manual can be found here.

Like Wilber? You can get him here.

Great tute – thank you Nic. An amazing difference!
Thanks, Robyn! 😀
you give great tutorials!! Lovely resulting image!
Thanks, Cybele! 🙂