

Week 2 – Click to enlarge
It started out as a lark. I was reading the tutorial by Pat David for Color Curves (to link it to one of my own tutorials so that I didn’t have to reinvent the wheel) and in it he talks about how Hollywood has gotten on an Orange/Teal kick, he even linked to another blog that has movie screenshots of this Orange-Teal-Hell… I found it very amusing, and just the right amount of snark.
In the back of my mind I kept thinking about it, wouldn’t it be funny to convert this image to Orange-Teal-Hell. And keeping with my current theme this month of having my image look like something I remember from a film it seemed to fit nicely (if, indeed, that is my theme this month).
At first it was as hideous as I expected it to be, but then… I pushed the image a bit further and POW! I got something out of it that is really great. Have you ever done that? Tinker, tinker, tinker… *eyebrows rise in surprise, head tilts back a bit, a smile crosses your face* … yeah, that. 🙂
It was around midnight when I finished the image and I decided that perhaps I should sleep on it. In the morning, I still liked it, but it needed just one more tweak. I then showed it to my husband, and he liked it as well… so in my book it is a winner. 🙂
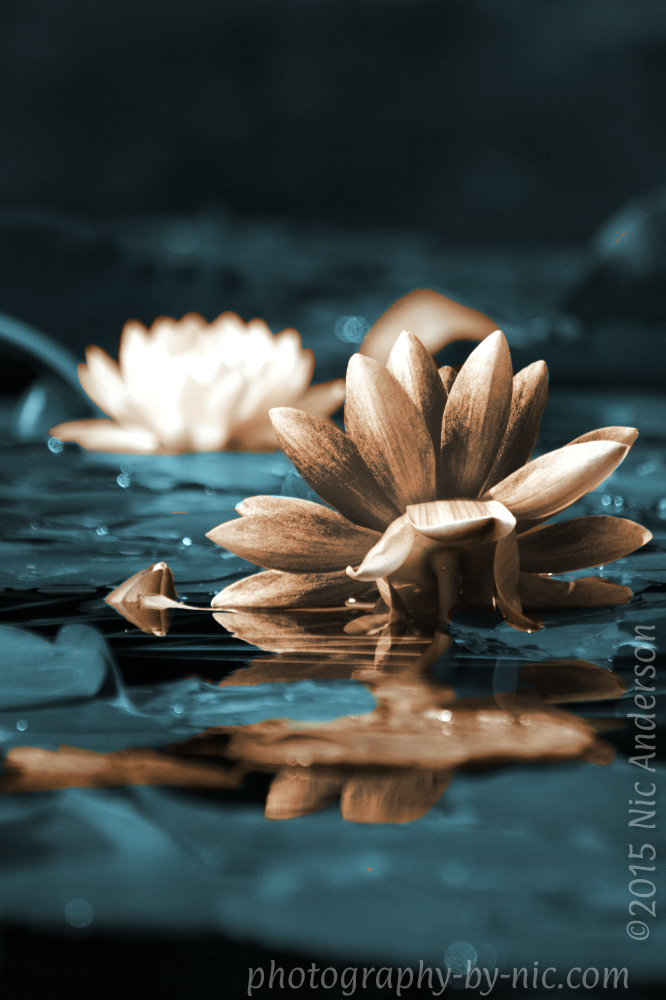
And perhaps because I pushed the image a bit further it no longer falls under the Orange-Teal-Hell? I really don’t know, but my pink flower isn’t orange anymore, and the lily pads are closer to green than teal… oh who cares… I like it, and that’s all that matters. 😛
For an attempt at brevity of a rather long process keep reading. I made all my edits this week in GIMP*.

Kind thoughts and comments welcome. 🙂
**Side note** Happy Blog-aversary to me! WordPress reminded me that I’ve been blogging for 6 years! Woohoo! I ran a food blog for four years that morphed into a love for photography, I then created this blog that focused on photography two years ago.
I have joined a month-long photo post-processing challenge called One Four Challenge, hosted by Robyn at Captivate Me. “This challenge is about processing 1 image in 4 different ways over 4 weeks.” Every Monday Robyn posts a new version of her photo and challenges us to do the same each week.
 How-To

- I started out with my image from week 1 up to the point where I adjusted the brightness and contrast (last week’s step 3).Unfortunately I didn’t realize until I had finished all the work that I was working on a 1000x666px image, so I will have to redo it all if I want to print it. Oh well.

- Next I tried to play around with color curves to *make* the flower orange and the lily pads teal… it didn’t work out very well because I was having to push the color curves so far it started making a mess really quickly.Instead, I found that a split-tone worked out much better.As suggested by Pat David, I used an online tool by Adobe called Kuler. It is a tool for color visualization and palette creation, it gives you a palette of colors based on some classic color rules (complementary, triad, etc.). I used it to get the RGB codes for an orange and a complementary teal (I used the center orange and the lightest teal).

click to enlarge
Armed with the RGB codes, I found out what my Hue value would be so that I could use that value for the colorize portion of split-toning (check out my split-toning tutorial for further instruction).

After making my split-toning layers, I had to do a bit more painting of the masks because some of my shadows needed to be orange and it needed some cleaning up overall.
click to enlarge
Isn’t it wonderfully hideous?! 😀
- It was way too extreme… so I reduced the opacity (teal:44% orange:52% ) and turned on visibility to the desaturated layer (which was created during the split-toning process) underneath.

reduced opacity split-tone over greyscale layer
- I wanted the back flower to be closer to white so I played around with Color Curves.

color curves to make back flower closer to white
- Then inspiration hit me. I decided to use this split-tone as a filter of sorts on top of my original image… so I tweaked the curves once more on my original image (lowering the midtones).

more curves adjustments to original image
- Then I copied my split-tone image and tweaked the curves on it as well (also lowering the midtones).
even more curves adjustments on split-tone
- Then I changed the blend mode of the split-tone to Multiply and I had my POW! moment.

POW!
- In the morning I decided that the bokeh needed to be less green, so I added a white mask to my Multiply layer and painted grey over the bokeh to bring out the original colors. Which gives me my final image.

Week 2


If you were able to follow along, wow that’s awesome! I know this How-To wasn’t as in-depth as my usual tutorials. But I also know that it was a lot of steps and it is rather intimidating, so I opted for an overview. If you have questions or want clarification, I’d be happy to help.
Until next time…
~nic
* GIMP is Open Source software that is available for all platforms (Linux, Mac, and Windows), it is a photo editor that does many (if not all) of the things you can do in Photoshop. You can download it for free here. The GIMP online manual can be found here.
Like Wilber? You can get him here.

Gorgeous colours! I love the darkness and moodiness of it. I also love seeing your processes as you worked towards the final image – I’ve never tried split toning but now feel like I might have to give it a try. 🙂
Thanks, A Fairy Mind! I’m new to split-toning too. Ben Rowe has a great tutorial (LIghtroom) on split-toning, he covers some color theory as well which will help you decide which colors to use for split-toning. Pat David has a great split-toning tutorial (GIMP), and he explains a bit the masking that you need to do to accomplish split-toning like I did on this image.
Thanks, I’m really liking the darker more mysterious version of this image as well. 😀
Thank you! I’ll have to check those out. 🙂
You’re welcome. 😀
gorgeous results!! I love the deep tones but also the split tone!! I admire the explanations- I never remember everything I did lol!! ( my usual disorganization)
Thanks, Cybele! I do keep some mental notes as I work, but really I tend to create so many layers (some of them are just snapshots) that when I go to write up the tutorial later I can attempt to explain my process. I’m so glad you like the tutorials. 🙂 I’m actually getting a few likes for the Orange-Teal-greyscale (I kinda like the one after the darkening with curves)… I think at the end of the month I’ll have to include that one too in the poll. 🙂
What a post! I can’t say it enough times…you rock with the explanation of your post-processing choices. Amazing edit, I really like how it turned out.
Oh, thank you so much, Lore! 😀
Last weeks image was really fun. This one is much more serious. I love the use of the split tone to add a slight shine and contrast to the image. Great work Nic.
Thanks, Ben! I thought about your split-tone tut after I got the final image and wondered if orange-teal would have been a usual pick for a pink-green image. 🙂
On first appearance it does seem strange yet bth sets are complimentary to each other snd I wonder if they are spaced evenly enough on the colour wheel and that is why it works. Another reason is also that the teal orange is just a hint and not overpowering the green pink combination.
I think you are right, Ben. Thanks! 😀
Very moody in the dark tones!
Thanks, Chris! I’m digging the moody-ness of it too, I’m glad I just went for it with this image. 😀
I LIKE it too! Love the incredible depth you’ve achieved here Nic. Very interesting to see the transitions too. I do like what you finished with. Yes the Orange Teal thing is real in the movies of the past few years.. I’ve read about it too..lol Orange and Teal Hell will probably be the ‘Style’ of the early 21st Century for movie making 😛
Thanks, Robyn! The depth/darkness is something I’ve always loved about other people’s images but I for some reason never pushed my own images this far, I am very pleased with the final image. People of the future are going to look at our Orange-Teal-Hell movies and wonder what drugs we were on like when we look at movies from the 60s, haha! 😀
Ba ha ha! 😃
love the color and intensity
Thanks, Julz! I love the dark jewel tones too! 😀
I don’t know. I really like the reduced opacity split-tone over the grayscale layer image. And yet, the finished image is a stunner, too! 🙂
Thanks, Emilio! That’s cool that you like the orange/teal/greyscale one, it’s not that bad – not the Orange-Teal-Hell of the first full opacity one heehee. The final image was a shock at how gorgeous the colors turned out. I’m very pleased with it. 🙂
I like the colours in this edit!
Thanks, Now At Home! 😀 I really like the jewel tones too!